Most universities have unix clusters for students to use for research. Stanford has the rice clusters, as well as sherlock and yen for faculty-sponsored (loosely defined; many faculty members aren’t unix users and are happy to dispatch an email that gets students access).
Graduate students interested in doing empirical or methodological work should get set up on these as soon as they can, because compute clusters are substantially more powerful than even the beefiest personal computer and can run long jobs (e.g. if you use MCMC methods). Also clusters let you live out the fullest version of the XKCD dream

This note records workflow tips stolen from the internet and accumulated by trial and error. They are written based on some specifics on the stanford compute clusters (primarily sherlock), but since most university / lab compute clusters use similar infrastructure, the general unix toolkit should be adaptable. A lot of industry data science is done on on-demand linux boxes (AWS/Azure/GCP, typically with sudo access), so the command-line workflow is very effective there too [+ you don’t typically have to worry about modules or submission queues], especially relative to working entirely off jupyter notebook UIs.
It presumes that you are not terrified of the command line (or at least hopes to assuage your fears / show you that it is worth learning) and have access to a unix shell (straightforward on Linux/MacOS, increasingly straightforward on windows through Windows Subsystem for Linux) with an ssh client.
basics
login
Read the sherlock guide first.
One connects to the cluster with some variation of the following call to the ssh client
ssh <email>@<clustername>This can get tedious, esp if the cluster name is long, so for repeat-use jobs, save the following snippet in ~/.ssh/config
Host <shortcut> login.sherlock.stanford.edu
  User <username>
  Hostname login.sherlock.stanford.edu
  ForwardAgent yes
  ForwardX11 yes
  RequestTTY yes
  ControlMaster auto
  ControlPath ~/.ssh/%l%r@%h:%p
With this, you can now log in by simply running ssh <shortcut>. The last line avoids multiple duo prompts, which can get quite annoying on most modern clusters that require 2FA.
multiplexer
By default, when you log in to a modern compute cluster with job submission, you get put in a login node that is for light administrative tasks; if you try to run any heavy computation tasks, your job will be booted.
You start with a single terminal window. This can be quite limiting for most work, so the first thing you should do is to set up a terminal multiplexer. I like tmux. Like many unix programs, it has awful defaults and requires some setting up [at the very least, edit ~/.tmux.conf to remap Ctrl-b to Ctrl-a; if you’re feeling ambitious, follow a guide like this one]. screen is the antecedent, and byobu is a similar modern alternative.
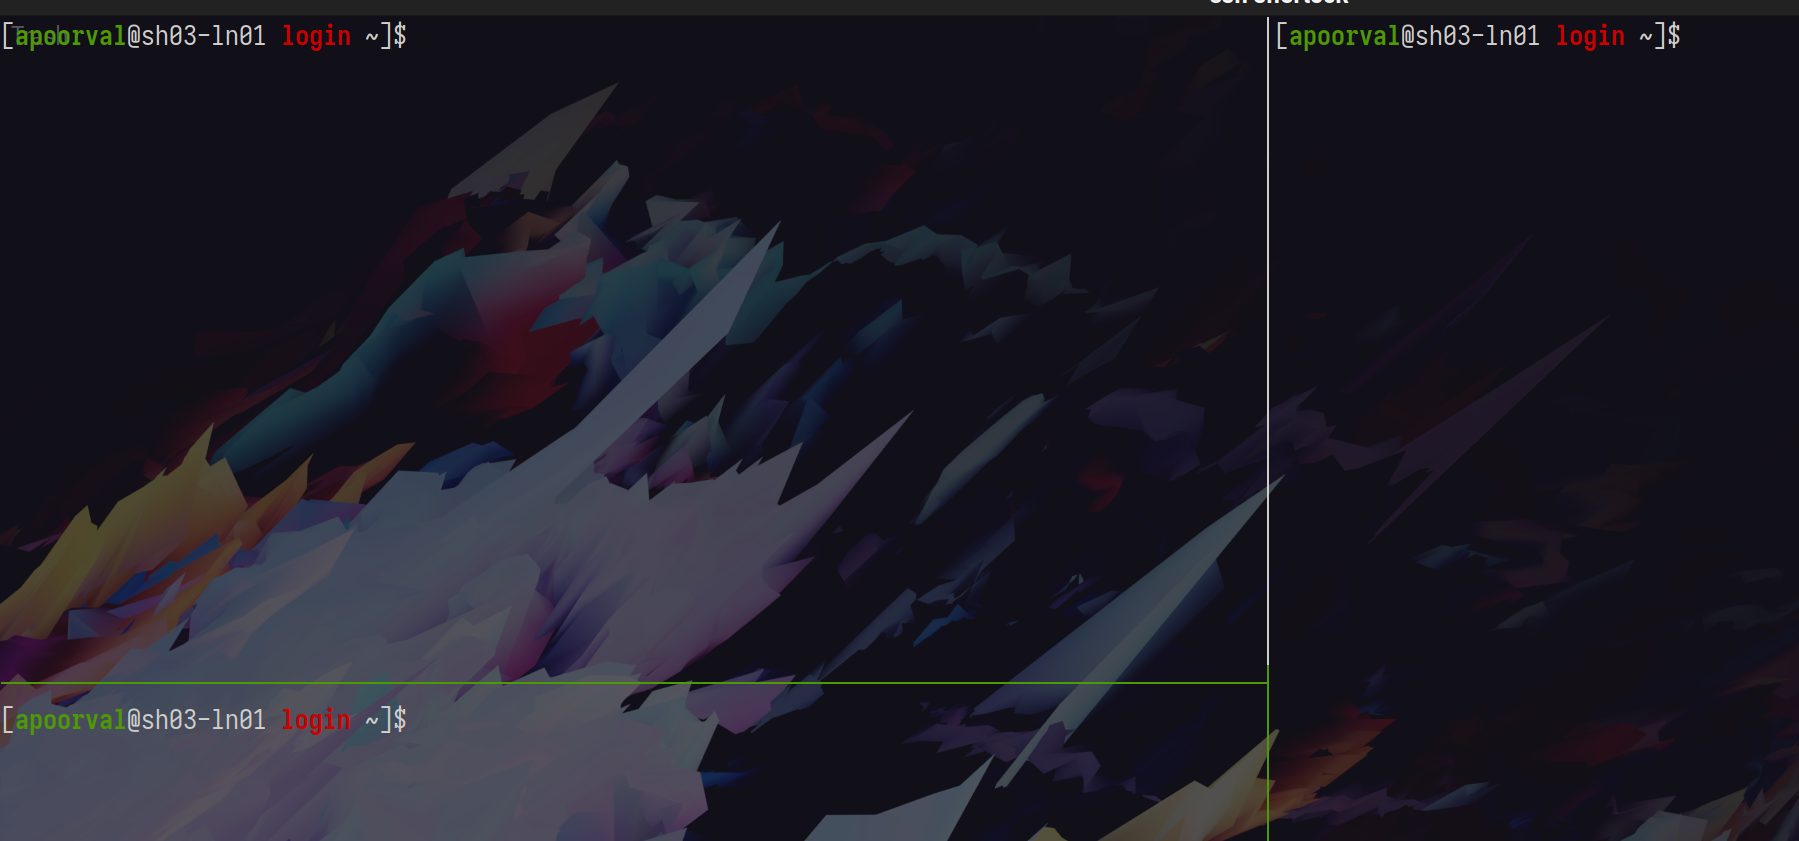
Once you learn to split the terminal, you will typically work in terminal windows that look like this

[transparent terminal windows are worth it, if only so you see your aesthetic wallpaper]
Tmux also persists across logins, which helps a lot if you or your internet connection is working intermittently.
computation
modules
Most compute clusters serve a wide variety of research needs and don’t give you sudo privileges. Instead, they require that you use pre-packaged modules. Sherlock’s module interface is helpfully named module <command> and you will use it often.
Package management can sometimes turn into a nightmare on clusters, and you will sometimes have to email the admin, or use container tools like docker (or sherlock’s version: Singularity). Python environment management systems like conda may or may not be available, so singularity containers help a lot for projects with complex dependencies (e.g. spatial data ones that rely on legacy tools like gdal). Some clusters have well documented lists of modules, e.g. sherlock’s list.
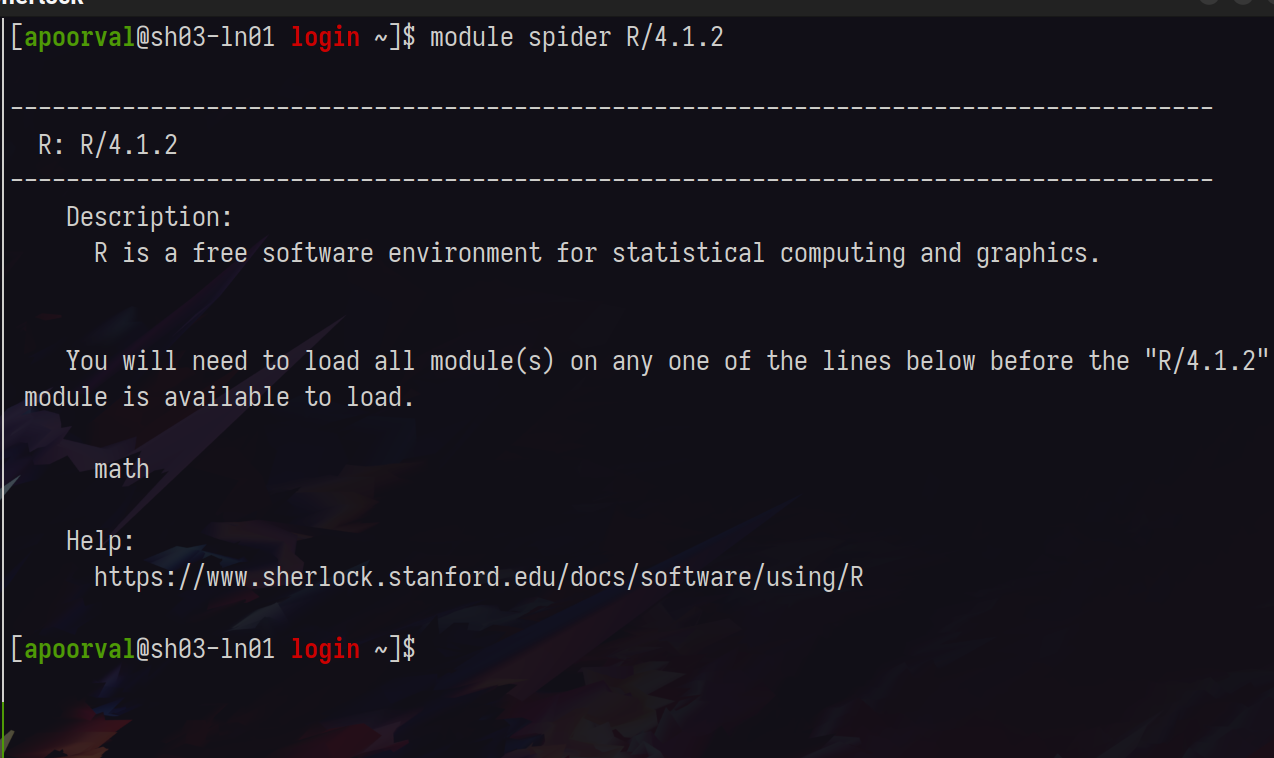
You can query a module by running module spider <name>, narrow your search, until you’ve picked out the module you want

The system and rclone modules will also be extremely useful.
editor
Most scientific computation involves writing code in plaintext files that are then passed to a command line program (contrast this with point and click interfaces, which, in addition to being tedious, are a reproducibility nightmare and should be avoided at all costs).
There are many editors you can use to edit your code. I like vim, others like emacs and won’t shut up about it despite it being an operating system with a middling editor attached and a sure-fire way to give yourself carpal-tunnel by the time you turn 25. Vscode and sublime text are also good.
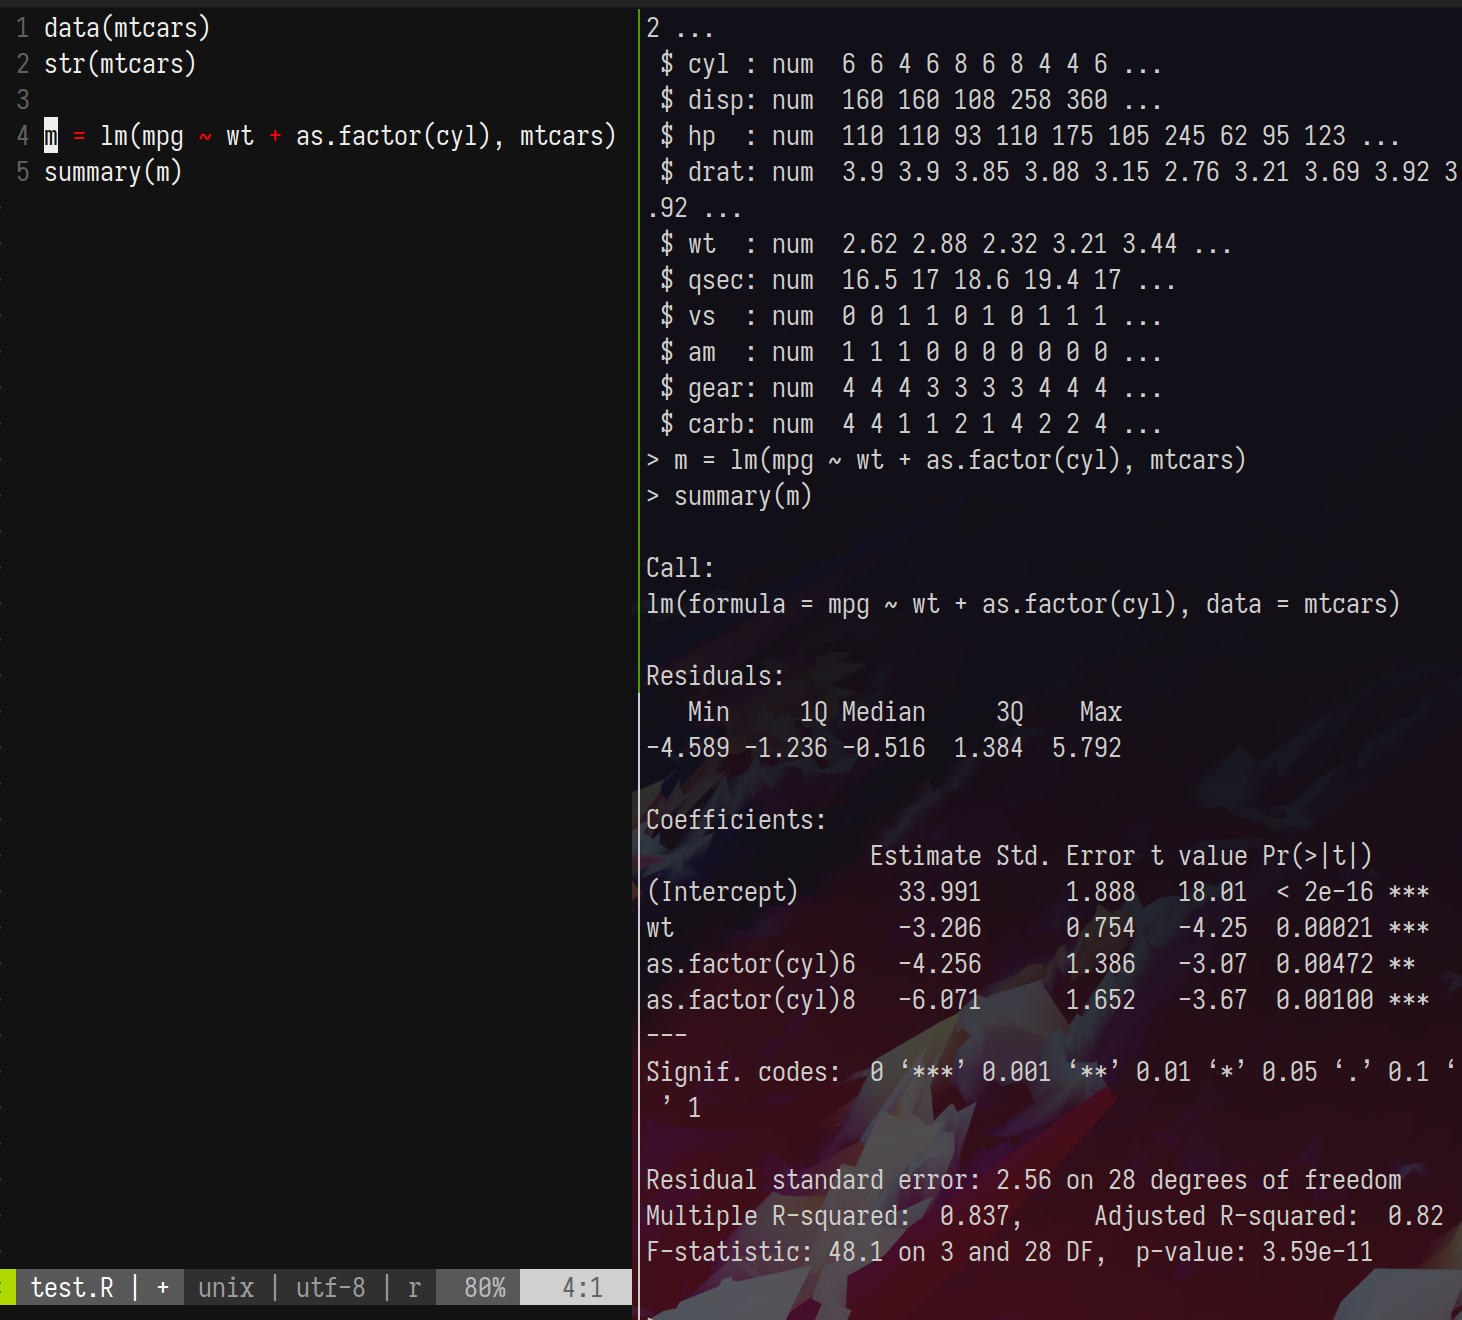
Despite having an absolute cliff-face of a learning curve, the former two have the benefit of running painlessly on the terminal, which is useful for our purposes. You can also use something fancy like vscode’s remote development suite. I’m partial to my vim + slime setup as it is a very light-weight solution for a terminal-focussed workflow. When paired with tmux [and some customisation using your ~/.vimrc], this allows one to work interactively like so

I’m using vim to write code and send it to the R console using \ + s [set in ~/.vimrc, going down the vimrc customization rabbithole is a rite-of-passage for the young unix-nerd]. This approach works equally well for python, julia, stata, matlab, or any other programming environment that has a command line UI.
x11 also allows you to fire up interactive windows for plots. Check if your setup is working by running xeyes.
Data
For most scientific work, you’ll need to get your data on and off the cluster. git is excellent for code, but should be avoided for large files.
SCP
scp is a classic solution to get files on and off linux machines. Read the manpage here.
A typical call is scp <source> <destination> where source and destination may be your computer and the cluster, or vice versa. A -r flag copies directories recursively.
Rclone
Most people already do or really should be using cloud based backup services like dropbox/google-drive. Since many of these providers can’t be bothered to provide a viable command line solution, an open source solution called rclone was developed. You most likely have a conventional dropbox location on your local machine (e.g. ~/Dropbox) that syncs automatically, but it is likely too big / disorganised / personal to sync entirely on your compute cluster. Instead, you can use rclone to sync programmatically.
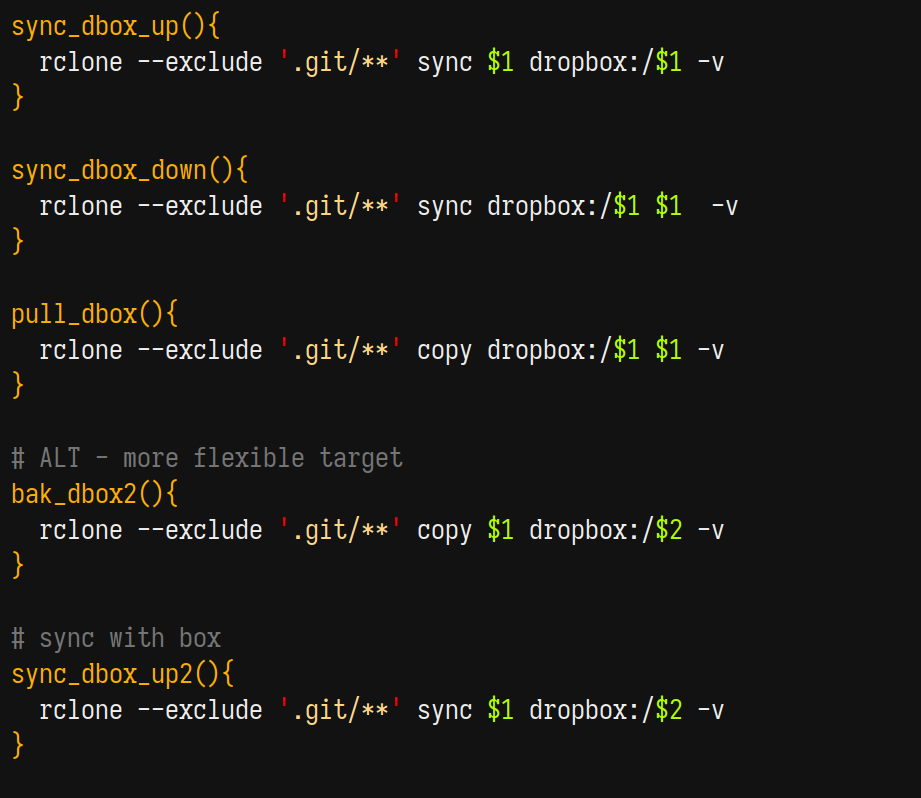
Rclone commands look a bit like scp commands with an additional (very helpful) keyword (sync or copy). For example, I keep my research in a path that looks like this ~/Dropbox/Research and so whenever I work on projects in a subdirectory, I rely on the following commands heavily

where dropbox is a location that was defined when I logged into dropbox on the cluster (login is one-time and painless). When starting work on a project on the cluster, I clone a directory from my dropbox onto the cluster once using pull_dbox <path_in_my_dropbox>.
- After any substantial work on the cluster, I run
sync_dbox_up <path_in_my_dropbox>to upload changes to dropbox, which then syncs to my local automatically - After any substantial work on my local, I run
sync_dbox_down <path_in_my_dropbox>on the cluster to download changes from dropbox
sync avoids uploading or downloading files that haven’t been changed (which is usually the vast majority of any research project directory) and as such the transfers are quite quick.
These shortcuts create the full path Research/<project_name> on the cluster for command brevity. the suffixed 2 commands allow for a custom path either on local or remote.
Job Management
Login nodes are for light tasks and will kick you off if you misbehave by running a 32 core parallelised task that requires 32 gigs of RAM. Most large clusters enforce a strict login/job management system. Sherlock uses the futurama-inspired slurm, which is widely used and kind of inscrutable, so you should learn the minimal amount and ask for help rather than trying to parse their website.
Interactive nodes
For interactive development that is too heavy for a login node (i.e. most), you’ll want to ask for an interactive node. On sherlock, this is made easy using the srun command, which basically asks for an interactive bash shell. I use one of the following (typically only the first)

The first alias sdef0 requests a node with 4 cores, 8 GB RAM, for 2 hours, which is plenty for basic data munging and testing before submitting a job. The latter two increase demands and might work over breaks but will otherwise languish in the queue for ages.
Submitting Jobs and monitoring them
Slurm jobs need to be submitted using either a convoluted command line call or a submission script with a ton of metadata on top (I just keep a slurmer file in my home directory that I clone for jobs). Slurmer looks like this
#!/bin/bash
#SBATCH --job-name=<name>
#SBATCH --begin=now
#SBATCH --time=02:00:00
#SBATCH --partition=hns
#SBATCH --mem=32G
#SBATCH --ntasks-per-node=16
#SBATCH --mail-type=ALL

# module loads
ml R/4.1.2

# program call here
Rscript <Program>
The script is pretty self-explanatory, and you submit by running sbatch <slurmer.sh>. Slurm will tell you that the job has been queued, and once it starts running, it will create a log file named slurm_<random_long_number>.out to write out console output. You can monitor your code progress by running tail -f <logfilename>, which prints the file and watches for updates.
Put together, your interactive testing + job-submission workflow may look like this

with the submission script slurmer, R script, and job output.
Notifications
Several programmming languages have APIs for notification providers. I like pushoverr; I frequently ping myself from the cluster to alert me when big jobs get done. You’ll need to generate an API key for pushoverr or pushbullet and those can be stored for persistent use in the .Renviron file.